Tuesday, 22 January 2013

Drilling Beach Pottery

For Christmas 2012, I made simple pendants with driftwood and fresh water pearls (I cut up one of my pearl strings) for my Bible Study girlfriends.


Yesterday for the first time I attempted to drill holes in some of my beach pottery with my regular hand held drill and a Spade bit. It was almost a complete success except for one piece which cracked as I was unable to hold it down properly while drilling.

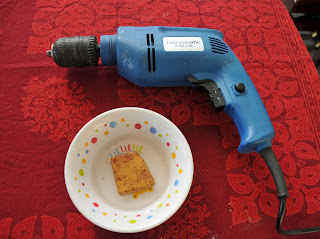
Here are the things I used:


                                                                                           Hand held drill, Plastic bowl and a flat stone


                                                                                                                Spade Drill Bit

The steps I followed were:

1. Put the flat stone in the bowl (Initially I tried with a flat piece of wood but it kept floating away). Filled it with water till the stone was immersed.

2. Marked the pottery piece with a pen for where I wanted the hole to be and then placed it on the stone in the bowl and added extra water to just about immerse it.

3. Held the Pottery piece down with a plastic fork and placed the drill on the mark and started drilling at slow speed. Sometimes the Drill bit would wander off the mark and I had to stop and start again.

4. Now and then I changed the water if it became too muddy.

5. Once the hole was made, I flipped the Pottery piece around and drilled it to make the hole bigger, i.e. same size as the front.

Here are the results of my drilling:


Now I just need to learn some wire wrapping skills to make double loops like '8' to fit onto these pendants and chains / leather cords!

Hazel


Driftwood Candle Holder


I love the driftwood candle holders which are made of two or three pieces artistically put together. In fact I did try to make one a few months back but could not get my head around how to hold the pieces together. I just could not get them to stay that way!

Yesterday I decided to give the Candle Holder another go and this time I was successful!

I difference between my failed and successful attempt was the fact that instead of nailing the first two pieces together at just one place, I nailed them at two! This gave the structure sturdiness. Then I added the third leg to make it even more stable and aesthetically more appealing.

Here is the finished piece which I am quite pleased with. This has certainly given me the confidence to attempt more such Candle Holders. Next time I will remember to take and work in progress photos too!

Hazel


Sunday, 19 August 2012

Driftwood Lamp - Ikea Hack!

A project that has been on my mind for some time is to make a driftwood lamp. Some time back I had found this lovely piece of driftwood 33 cm long and 10 cm dia. which was just perfect for what I had in mind!


I also had a old Ikea table / bedside lamp which was no longer steady on its base and thus relegated to storage.


I disassembled the lamp from its base. Had to cut the plug too as it was a fixed one.


Also drilled a 1 cm dia. hole through the length of the driftwood using a long drill bit which I borrowed from an electrician. It was not possible to drill the hole in one go so I had to start drilling smaller holes before I reached the desired size.

For the base I used an Ikea plate holder which we no longer used.


After estimating the width of the driftwood, I drilled two holes for the screws in the base and the through the bottom end of my driftwood. It was tricky to hold the base on the uneven upside down driftwood so I drilled the first hole through the two woods and then held them together with a skewer stick temporarily. I could then drill the second hole with ease. 

I then painted the Ikea base white with two coats of paint.

The lamp was finally ready for assembly! 

I put the lamp pole with the wire from the top of my driftwood piece and pulled it from the bottom. Then I pulled the wire through the base. The driftwood was slightly longer than the lamp pole but that did not really matter! I also fitted four stick-on bases used under furniture. This allowed passage for the wire to come out from under the base without tilting the lamp.


Finally I fitted a new plug, put a bulb and a lampshade borrowed from another lamp and voila I had a beautiful driftwood lamp!


Isn't is beautiful!

I need to get a new shade, a bit long than this one to cover the socket fitting visible at the top of the driftwood but am very pleased with the results as is too! 

Tuesday, 14 August 2012

How it all started!

I have always loved handicrafts and have particularly enjoyed watching crafts people doing their thing.

As a kid I would dig up the earth in our back yard, craft human faces out of it, leave them to sun dry, paint and hang my master pieces on the walls.

However studies and then job took precedence with not much time left to indulge in crafts. Despite this I made time to attend pottery and stained glass classes in the evenings. 

Now that I am a full time mum and master of my own will (well, most of the time!) I finally have time to do what I love so much! And now I have a creative partner in crime, my six year old daughter, Amelie, who inspires me and helps me through this journey.

We live in a beautiful village near Lausanne, a minutes walk from Lake Leman. Most days Amelie and I walk by the lake which is like a wonderful ever changing canvas with a breathtaking view of the Alps! Since the past few months we have made our walk even more meaningful as we look around for beach glass, pottery and driftwood. We get all excited when we find a nice piece and there is always a competition between us as to who found the best piece at the end.

The walk and search for our beach 'treasures' is reward enough for us but the fact that we can then make something out of it is the icing on the cake!

Through this blog I intend to share some of our experiments and experiences!

Cheers,

Hazel